With the release of ProPresenter 7.1 comes the introduction of a Capture option for screen recording and streaming.
Recording a screen from your ProPresenter output can be done with just a few simple steps of setup.
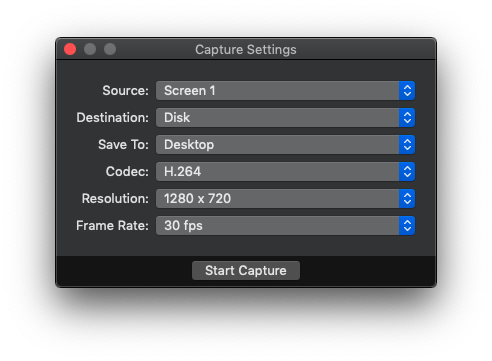
To access the Capture settings window, go to Screens>Capture Settings in your menu bar. The window that opens will allow you to set the parameters of your Recording. For the purposes of this article, we'll focus on the Recording option to a Disk. If you are looking to use an RTMP streaming option, please take a look at this article.

The Capture Settings window offers you the options to set the parameters for your output recording. Below we'll highlight each option in this window.
- Source: This is the screen that you wish to capture from your Screen Configuration window. You can capture any currently set Audience or Stage screen. At this time, this is a single source, so you can only capture one ProPresenter screen at a time.
- Destination: This is where you select if your recording will be saved as a video file or sent out via an RTMP stream -- RTMP streams are explained here
- Save To: Here you will select where you want the recorded video file to save. You can select the Desktop, Documents, or Movies/Videos folder by default or browse to choose another location to save the file.
- Codec: This is the codec that your video file will be encoded in. Typically, H.264 is the most widely used option, but other codecs may be used to create a larger or higher quality video option.
- Resolution: This is where you will set the resolution size of your video file. We would recommend matching this resolution to the resolution of the screen you are capturing. Typically, this is 1920x1080 or 1280x720, but there is also an option to set a custom resolution.
- Frame Rate: Here you can set the Frame Rate of your recording -- again, the best setting here varies on how you will be playing this back and what needs you have. If you are inputting a video input into the program, we recommend using the frame rate of that video input.
Once you have your settings in place, you can either click Start Capture to immediately begin the capture or close out of this window. You can then go back to start a capture in the Screens menu by going to Screens>Start Capture.
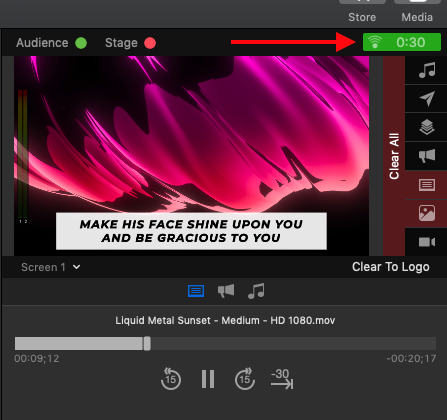
When you begin the Capture, a green progress indicator will appear in the upper right of your Preview window.

Once you are finished recording, you can stop the capture through either clicking on the green indicator in the Preview window and going to Stop Capture, going to the Screens menu>Stop Capture, or through the Stop Capture button in the Capture Settings window.
Comments
0 comments
Article is closed for comments.